mp3Tag Pro helps you download missing tags for your music files (MP3, APE, FLAC, M4A, AAC, and others), import tags from text files, create playlists, generate tags from filenames, and more. On the other hand, you can use information from tags to rename audio files, so instead of names like track01 the program creates meaningful filenames according to your preferred pattern.
Sorting audio files is closely related to renaming. In the corresponding article we discussed how to change filenames using information from tags. But this can easily be extended to sorting songs, if we use a format that creates folders.
Here we will take a group of MP3 files stored in a single folder and use mp3Tag Pro to create a clear structure of folders. All songs will be sorted into their respective folders (by music albums). Other supported formats can be sorted in the same way.
Select Songs
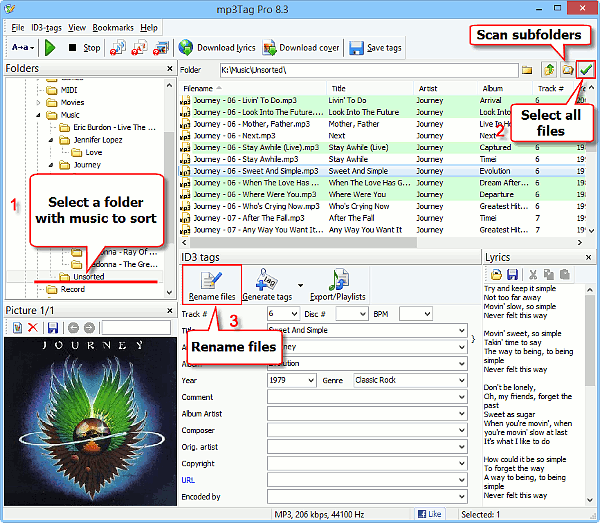
As usual, we start with selecting audio files. In the “Folders” area (1), select a folder with audio files to sort.
Files from the folder are displayed in the main area, on the right. If there are some nested folders, and you need to include audio files from them as well, click the “Scan subfolders” button.
To select all displayed files, click the green checkmark button (2), or press Ctrl + A.
Finally, click the “Rename files” button under the list of files (3).
Rename And Sort MP3
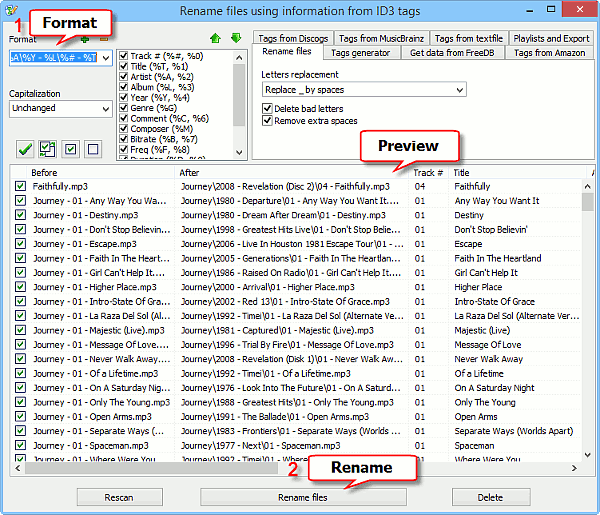
mp3Tag Pro opens a new window. All files that we selected in the previous step are displayed along with their tags in the main area of the window:
Now we need to select or enter a pattern into the “Format” field (1). We discussed this in more detail in the article about renaming, but now we will additionally create folders. As usual, all variables are available in the list next to the “Format” field.
To create a folder, use the backslash character in the “Format” field:
\
For example, we can sort all songs by albums without changing their filenames:
%L\%O
This format tells the program to use album names (%L) for creating folders. Files of each album will be sorted into the respective folders without changing their filenames (%O stands for “Old filename”, do not confuse that with %0 (null), which stands for track number).
If we sort our music files so and then open the folder in Windows Explorer, we will see the album folders sorted alphabetically. In most cases, however, it is more natural to have all albums of an artist sorted chronologically, by their release year.
So, we can modify the above format to include release years:
%Y - %L\%O
This will create folders like “1988 – Greatest Hits” and sort songs into the respective folders without renaming them.
However, our filenames do not follow the same pattern, so maybe renaming them would be a good idea. We adjust the format once again:
%Y - %L\%# - %T
This will rename our files using the <Track#> – <Title> format, so a real-world filename would look like “01 – Higher Place.mp3”.
Now we have all songs sorted by albums. This is already better than the unsorted heap of files we had previously. However, albums are typically released by artists, so we can improve the format further by sorting album folders by artists:
%A\%Y - %L\%# - %T
This will create a folder for each artist (%A), into which all albums of the artist will be saved, sorted chronologically.
Click “Rename files” (2) to sort your music files.
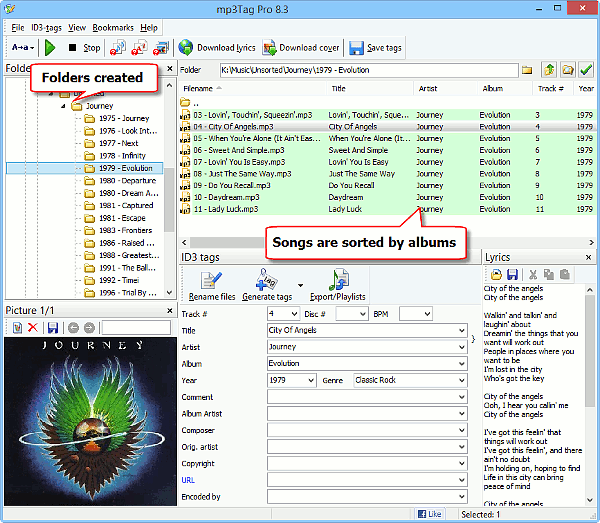
The “Rename” window is closed, and our MP3 files are now sorted.
Further Formats
You can easily create your own naming patterns for folders, just like you do for filenames. In our example, we saw how to create a two-level directory tree (Artist / Albums / Songs), but you can also create 3 and more levels. For instance, we additionally sort artists by genre:
%G\%A\%Y - %L\%# - %T
You can always see future file/folder names in the preview area of the “Rename” window.
Like with filenames, any variable from the list near the “Format” field can be used for folder names. Additionally, there is a special item for folders: “..” (two points). It is used to go “one level up” in the current directory structure. For example, we have a directory structure created in the previous step: Artist/ Albums/ Songs. Now, if we want to move all songs from individual album folders into the parent folder of Artist’s folder, we can use a format like this:
..\%O
Please note that the “level up” rule applies to the folder selected in the “Folders” area of mp3Tag Pro. If you press the “Scan subfolders” button, you can work with all files from all subfolders. No matter how deeply the files are nested in the selected directory, they all will be moved up to the parent directory of the currently selected one.
Another special items for folders allows moving files from nested folders into the currently selected one: “.” (a single point).
.\%O
If we use this format instead of the previous one, all songs from individual album folders will be moved into the artist’s folder (and not into its parent, which, in our example, is “Unsorted”).
Using the above described methods, you can easily sort, organize, and re-organize songs and other audio files on your disks.
 en
en Italian
 German
 French
 Spanish
 Russian


