AudioConverter Studio offers a user-friendly method of converting between different audio formats, a wizard. Thus even inexperienced users can convert music files immediately, without reading manuals or other documentation.
But if you have to convert audio files quite often, the wizard mode with its steps and confirmations may become too slow for you. That’s where you can consider switching to the classic mode.
The main advantage of the classic mode may be not obvious for beginners, but it is huge. Here you can do everything in a single step. AudioConverter Studio remembers your settings from previous sessions and automatically restores them. So, usually you can start converting with as little as a couple of clicks. In contrast, the wizard will ask you for each and every detail over and over again.
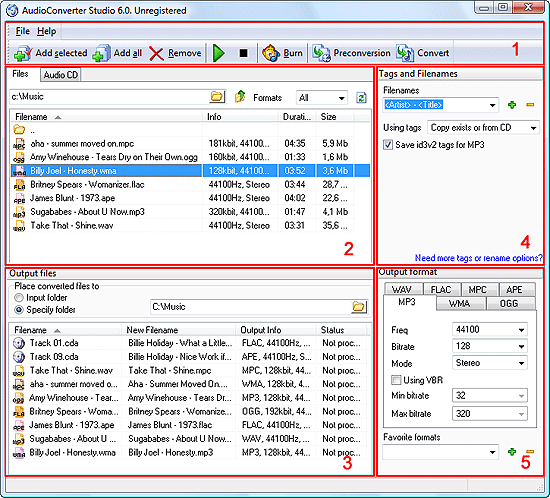
The classic mode is also more flexible. Here you can convert files to different formats in a single job, like on the screenshot below:

In the classic mode window, five different areas can be easily recognized. The first one contains different controls: menu and toolbar (1). Here you start required actions.
The second area contains input files (2). Here you pick out files, folders, or Audio CD that you want to convert or rip. If you want to convert audio files, choose the “Files” tab. To rip an Audio CD, click the “Audio CD” tab.
Right below is the “Output files” area (3). Here you define the folder where converted files should be saved and control what should be converted.
To the right, starting from the top of the window (under the toolbar), you find the other two areas: “Tags and Filenames” (4) and “Output format” (5). The first one controls naming of output files (AudioConverter Studio can rename files while converting) and what tags should be written.
In the “Output format” area you select target audio format and its settings.
Now let’s see how it works.
- Browse to a folder where you have some audio files. You can browse by entering some drive letter into the address field in the input area (2). Then double click a folder to enter it, or double click “..” or click “Level up”
 to exit the current folder. This is explorer-like browsing. Alternatively you can click the folder icon
  in the address field to get a usual “Browse” dialog.
 - In the tags and filenames area (4), choose a pattern for output filenames. If your files don’t contain any usable tags, the old filenames will be used. Old filename is default. To learn more about filename formats, read this section.
- In the output format area (5), select a target format by clicking its tab. For example, click MP3. On the tab, you can adjust available parameters: bit rate, frequency, mode.
- Double-click a file in the input area (2) to add it to the conversion list (3). You can also click this button on the toolbar (1):
 . To add all files from the current directory, click this button on the toolbar (1):
- On the toolbar (1), click the “Convert” button.
You can add whole folders for conversion. AudioConverter Studio will convert all files that it finds in subfolders. If you want to add folders for conversion, you should activate this feature in the “Options” menu.
If you have already added some files for conversion, and then you decide that another format should be used, or parameters must be adjusted, you don’t need to remove files from the list (![]() ) and add them again. Just select the files in the output area (3) and adjust format settings (5).
) and add them again. Just select the files in the output area (3) and adjust format settings (5).
Frequently used formats can be saved into the “Favorite formats” list for quick access.
If you are not sure how your files will sound with given settings, use the “Prelisten conversion” mode: ![]() . Prelisten conversion means that only a few seconds of each audio file will be converted for previewing purposes (adjustable in “Options“).
. Prelisten conversion means that only a few seconds of each audio file will be converted for previewing purposes (adjustable in “Options“).
 en
en Italian
 German
 French
 Spanish
 Russian